

 US Dollar
Easy fabric repair steps for lasting textile projects
Posted by BLG on 2026 Mar 13th
Posted by BLG on 2026 Mar 13th


You’ve spent hours on that quilt, only to find a tear along the seam. Or maybe your favorite handmade tote bag has a small hole that threatens to grow bigger. Fabric damage is frustrating, but it doesn’t have to mean the end of your textile projects. Learning simple repair techniques can extend the life of your fabrics, save money, and reduce waste. This guide walks you through easy, effective fabric repair steps that any crafter or DIY enthusiast can master, from basic preparation to creative visible mending that adds personality while strengthening your textiles.
| Point | Details |
|---|---|
| Quick repairs save projects | Basic fabric repairs can be completed quickly with minimal tools and prevent further damage. |
| Matching matters | Using thread color and stitch size that match your fabric creates durable, less visible repairs. |
| Preparation is critical | Cleaning fabric edges and stabilizing tears before stitching improves repair quality and longevity. |
| Visible mending adds flair | Decorative stitches and contrasting patches turn repairs into creative design elements. |
| Prompt action prevents waste | Fixing damage early stops it from spreading and extends the life of your textile projects. |
Before you can fix fabric damage, you need to recognize what you’re dealing with. The most common issues crafters face include tears from snagging or pulling, seam splits where stitches have come undone, and holes caused by wear or accidental punctures. Each type of damage requires a slightly different approach, but all benefit from immediate attention. Fabric repair extends the life of textiles, reducing waste and saving money, which makes prompt action worthwhile.
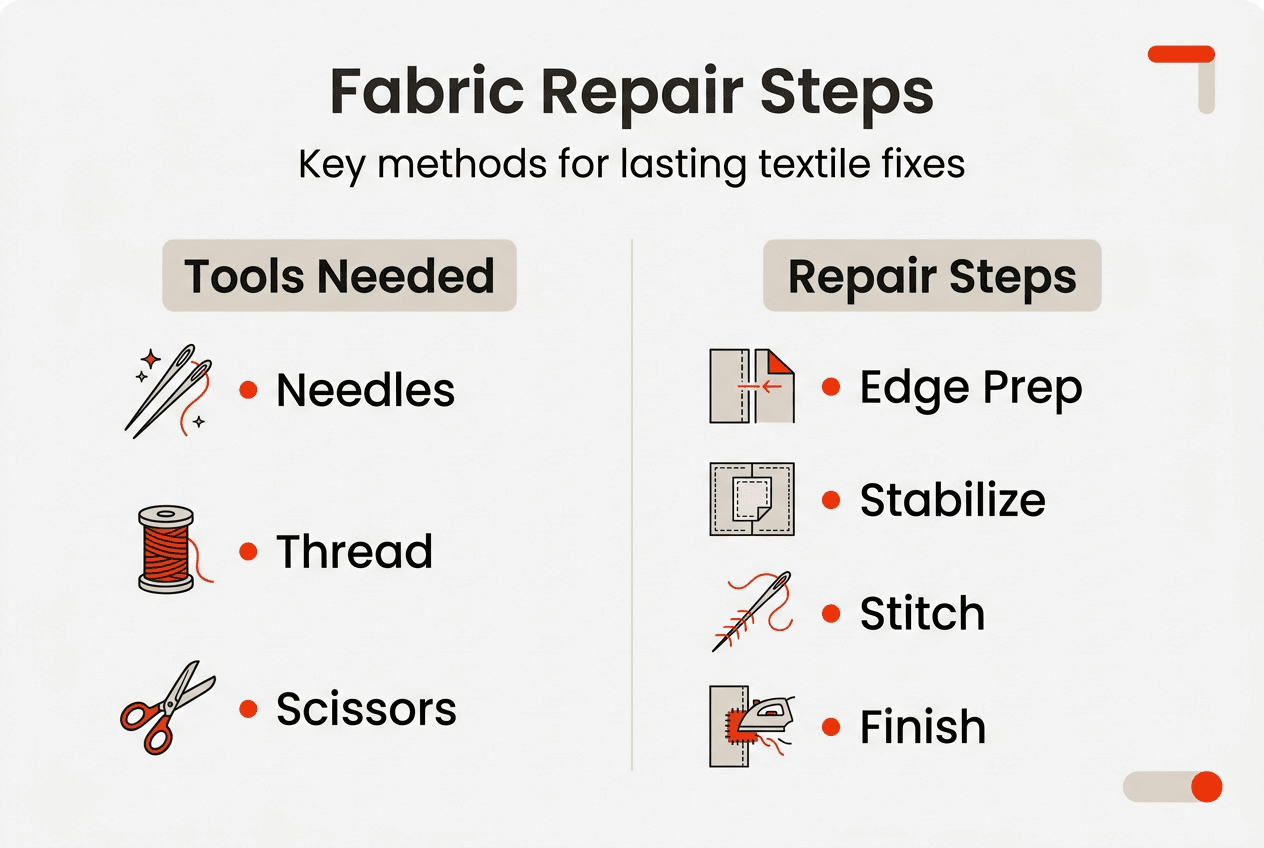
Gathering the right tools sets you up for success. You’ll need basic supplies that most crafters already have on hand. Start with a selection of hand sewing needles in different sizes to match various fabric weights. Thread in colors that blend with your fabric is essential, though contrasting thread works well for visible mending. Sharp fabric scissors help trim frayed edges cleanly. Optional but helpful tools include fusible tape for quick no-sew repairs and a darning mushroom or lightbulb to keep fabric taut while stitching.
Proper preparation makes the difference between a repair that lasts and one that fails quickly. Begin by cleaning the damaged area to remove dirt or debris that could weaken your stitches. Gently trim any loose threads or frayed edges with sharp scissors, cutting carefully to avoid enlarging the damage. If you’re working with a tear, stabilize it by placing a small piece of fusible interfacing or patch fabric underneath the damaged area. This backing prevents the tear from spreading while you work and reinforces the repair.
Different fabrics require tailored preparation techniques for best results. Knit fabrics tend to unravel, so you may need to catch loose stitches quickly before they run further. Woven fabrics can fray at cut edges, making clean trimming especially important. Delicate fabrics like silk or chiffon benefit from extra gentle handling and may require tissue paper underneath for stabilization during repair. Consulting a fabric care guide helps you understand your specific textile’s needs before you begin repairs.
Consider these essential preparation steps:
Taking time to prepare properly might seem tedious, but it directly impacts repair durability. A well-prepared fabric surface accepts stitches more evenly, prevents puckering, and creates a smoother finish. This foundation work also helps you assess whether you need additional reinforcement or if a simple stitch will suffice. Following a step by step sewing guide alongside these preparation tips ensures you’re building skills that apply across all your textile projects. The fabric cutting guide principles of precision also apply here, as careful trimming of damaged edges creates cleaner repair lines.
Now that your fabric is prepared, you’re ready to tackle the actual repair. Following a systematic approach ensures consistent, durable results every time. These steps work for most common fabric damage types and can be adapted based on your specific project needs.
Start by preparing your fabric edges if you haven’t already done so during the preparation phase. Trim any remaining frays carefully, cutting as close to the damage as possible without enlarging it. Clean the area one final time to remove any lint or threads created by trimming. This creates the cleanest possible surface for your repair work.

Stabilize tears and holes before you begin stitching. For tears, place a small piece of fusible interfacing or matching fabric underneath the damaged area. You can use fusible tape for a quick fix, though hand stitching provides more durability. Many basic fabric repairs can be completed quickly with minimal tools, making this step accessible even for beginners. For holes, you may need to bring the edges together gently or add a patch if the hole is too large to close with stitching alone.
Choose the appropriate stitch for your fabric type and damage. Seam splits are the easiest repair, often fixed with a whip stitch or backstitch that recreates the original seam line. For tears in woven fabric, a running stitch or backstitch works well to draw edges together. Knit fabrics benefit from a stretch stitch or zigzag pattern that moves with the fabric. Small fabric holes can be fixed with iron-on fusible webbing for a no-sew option or a running stitch around the perimeter to close the gap.
Thread selection impacts how visible your repair will be. For invisible repairs, match your thread color as closely as possible to your fabric. Hold thread against the fabric in natural light to check the match. If you can’t find an exact match, choose a shade slightly darker rather than lighter, as darker thread tends to blend better. Consider thread weight too, using finer thread for delicate fabrics and heavier thread for sturdy materials. Matching fabric types principles apply to thread selection as well.
Finish your repair by securing thread knots properly and checking tension. Start with a small knot at the back of your fabric, then make your first few stitches through the same spot to lock the thread in place. As you stitch, maintain even tension without pulling too tight, which can pucker the fabric. When you finish, create a secure knot by making a small loop, passing your needle through it twice, then trimming the excess thread close to the fabric. Gently press the repaired area with your fingers or a warm iron to set the stitches.
Pro Tip: Before cutting your thread after knotting, make one extra tiny stitch through the knot itself. This locks everything in place and prevents even the most secure knots from working loose over time.
Different repair methods offer varying benefits depending on your project timeline and durability needs. This comparison helps you choose the right approach:
| Repair Method | Time Required | Tools Needed | Durability Rating | Best For |
|---|---|---|---|---|
| Fusible tape | 5 minutes | Iron, fusible tape | Medium | Quick fixes, temporary repairs |
| Hand stitching | 15-30 minutes | Needle, thread, scissors | High | Permanent repairs, visible mending |
| Patch with stitching | 20-40 minutes | Needle, thread, patch fabric | Very high | Large holes, reinforced areas |
| Machine stitching | 10-20 minutes | Sewing machine, thread | Very high | Long tears, seam repairs |
Understanding these methods allows you to select the most efficient approach for your specific damage type and available time. The select lining fabric guide can help if you’re adding backing or patches to your repairs, ensuring compatibility between your original fabric and repair materials.
While invisible repairs have their place, visible mending transforms fabric damage into an opportunity for creative expression. This approach celebrates imperfections rather than hiding them, turning repairs into decorative elements that add character to your textiles. Visible mending extends the life of clothing, reducing waste and slowing down fast fashion habits while giving you a chance to personalize your projects.
Visible mending encompasses several distinct techniques, each with its own aesthetic and cultural history. Darning creates a woven patch over holes using needle and thread, building up layers of stitches that can be subtle or boldly contrasting. Patching involves adding fabric pieces over or under damaged areas, secured with decorative stitching. Appliqué takes patching further by adding shaped fabric designs that cover damage while creating visual interest. Sashiko, a Japanese technique, uses running stitches in geometric patterns to reinforce fabric. Boro stitching, also from Japan, layers patches with visible stitching to create a patchwork effect.
Visible darning highlights wear with bright patches and contrasting threads, making the repair itself a design feature. Choose thread colors that stand out against your fabric rather than blend in. Metallic threads, variegated colors, or bold primaries work beautifully for this purpose. You can also use embroidery floss, which comes in hundreds of colors and adds texture to your repairs.
The cultural significance of visible mending adds depth to this practical craft. Boro and Sashiko are distinct styles often used together, originating from Japanese traditions of resourcefulness and beauty in utility. Boro developed from necessity during times of fabric scarcity, while Sashiko began as functional reinforcement stitching that evolved into decorative art. Understanding these traditions enriches your mending practice and connects you to a global community of textile artists who value sustainability and creativity.
Visible mending techniques you can try today:
This approach is particularly accessible for beginners because perfection isn’t the goal. Irregular stitches and imperfect patches add to the handmade charm rather than detracting from it. You’re not trying to make the damage disappear; you’re incorporating it into a new design story. The fabric care checklist still applies to visibly mended items, as proper care ensures your decorative repairs last as long as the original fabric.
Pro Tip: Choose contrasting threads and fabrics that complement your original textile’s color palette rather than clashing with it. A navy patch on denim jeans works beautifully with bright orange Sashiko stitching, while a floral patch on a solid background benefits from thread that picks up one of the patch’s accent colors.
Even with the best intentions, certain mistakes can undermine your fabric repair efforts. Recognizing these pitfalls helps you avoid them and create repairs that truly last. Learning from common errors saves time and frustration while building your skills more quickly.
The most common mistake is using stitches that are too big or spaced too far apart, which makes the repair weak and noticeable. Small, evenly spaced stitches distribute tension across more points, creating a stronger hold. Aim for stitches about 1/8 inch long for most repairs, adjusting slightly larger for heavy fabrics and smaller for delicate ones. Consistent spacing matters as much as stitch size, so take your time and maintain a steady rhythm as you work.
Thread security often gets overlooked in the rush to finish a repair. Skipping the knot at the end can cause stitches to come undone, unraveling all your careful work. Always start with a secure knot and several reinforcing stitches in the same spot. At the end, create a proper knot by looping your thread and passing the needle through the loop twice before pulling tight. This double-loop knot holds much better than a single loop and prevents the gradual loosening that causes repair failure.
Tension control requires practice but makes an enormous difference in repair quality. Pulling the thread too tight can pucker the fabric, making the repair less aesthetically pleasing and potentially weakening the surrounding fabric. The thread should lie smoothly against the fabric without creating dimples or gathering. If you notice puckering as you work, pause and gently ease the fabric back to its natural shape before continuing with slightly looser tension.
Edge preparation deserves more attention than it typically receives. Frayed or ragged edges don’t accept stitches cleanly and can continue to deteriorate even after repair. Take time to trim edges neatly and consider using a small amount of fray check on fabrics prone to unraveling. Clean edges create cleaner repairs that hold up better over time. The fabric swatch selection guide principles of examining fabric closely before working with it apply equally to repair situations.
Regular inspection catches small issues before they become major problems. Check repaired areas periodically, especially after washing or heavy use. Look for loose stitches, thread wear, or new damage near the repair site. Catching these issues early allows for quick touch-ups that prevent complete repair failure.
Key mistakes to avoid:
“The difference between a repair that lasts six months and one that lasts six years often comes down to these small details. Taking an extra two minutes to knot properly and check your tension saves hours of re-repair work later.”
Understanding these common pitfalls transforms your approach to fabric repair. You’ll develop an eye for quality work and the patience to do things right the first time. These same principles of careful, methodical work apply across all textile crafts, building skills that enhance every project you tackle.
Now that you’ve mastered essential fabric repair techniques, having quality materials on hand makes future projects and repairs even more successful. Whether you’re creating new textile projects or gathering supplies for repairs, starting with durable, well-made fabrics sets you up for long-term satisfaction.

Our selection of backdrop fabrics offers sturdy options perfect for projects that need to withstand regular use and occasional repairs. These fabrics provide the durability that makes repair worthwhile, giving you textiles worth investing time to mend. For crafters working on home projects, our home decor fabric collection includes weights and weaves that repair beautifully and maintain their appearance through years of use. Quality fabrics accept stitches cleanly, hold repairs securely, and provide the foundation for both invisible and visible mending techniques. Explore our curated selection tailored specifically for crafters and textile enthusiasts who value materials that last.
Basic tools include needles in various sizes, thread that matches your fabric color and weight, and sharp fabric scissors for clean trimming. Optional but helpful additions are fusible tape for quick no-sew repairs and a darning mushroom or lightbulb to keep fabric taut while stitching. Most crafters already have these items in their sewing guide for beginners toolkit, making fabric repair accessible without special equipment purchases.
Consider whether your fabric is knit or woven, as this determines which stitches work best. Woven fabrics accept running stitches, backstitches, and whip stitches well, while knit fabrics need stretch stitches that move with the material. Smaller, evenly spaced stitches create stronger, less visible repairs regardless of fabric type. Matching fabric types to appropriate repair techniques ensures your work lasts and looks professional.
Visible mending works on many fabrics, though techniques vary depending on fabric strength, weight, and weave structure. Sturdy fabrics like denim, canvas, and heavy cotton accept bold decorative stitching beautifully, while delicate fabrics may require lighter-weight threads and gentler techniques. It’s particularly effective for adding character while reinforcing wear-prone areas like elbows, knees, and pocket edges. Following a fabric care checklist helps maintain both the original fabric and your decorative repairs.
Use small, closely spaced stitches and secure your thread with proper knots at both the beginning and end of your work. Avoid pulling thread too tight, which creates puckering and stress points that can fail over time. Prepare fabric edges carefully by trimming frays and stabilizing the damaged area before stitching. Regular inspection of repaired areas allows you to catch and fix small issues before they become major problems requiring complete re-repair.
Invisible mending aims to hide repairs by using matching thread colors and techniques that blend with the original fabric, making damage nearly undetectable. Visible mending celebrates repairs as decorative elements, using contrasting threads, patches, and embroidery stitches to turn damage into design features. Both approaches extend fabric life effectively; your choice depends on whether you prefer a seamless look or want to add creative, personalized touches to your textiles. Many crafters use both techniques depending on the item and the type of damage.