

 US Dollar
What is bias in fabric: essential guide for crafters
Posted by BLG on 2026 Mar 24th
Posted by BLG on 2026 Mar 24th

Many crafters think bias means any diagonal cut in fabric, but that’s only half the story. True bias sits at exactly 45 degrees to the fabric’s grain, unlocking unique stretch and drape properties that straight cuts can’t match. Understanding this precise angle transforms how your garments fit, flow, and conform to curves. Whether you’re binding edges, creating elegant dresses, or tackling your first bias project, mastering this concept elevates your sewing from functional to professional. This guide breaks down everything you need to know about working on the bias, from identifying true bias to cutting and sewing techniques that prevent distortion.
| Point | Details |
|---|---|
| True bias angle | True bias runs at exactly 45 degrees to the warp and weft, providing maximum stretch and fluid drape. |
| Maximum stretch at 45 | At 45 degrees, fabric stretches most because warp and weft shift equally without breaking. |
| Identify true bias | To identify true bias, fold the fabric so the selvage aligns with the crosswise edge, then test diagonal directions for the greatest stretch. |
| Drape and fit benefits | Bias cuts enhance drape and body conformity, especially for dresses and curved seams. |
| Stretch without elastics | The stretch from bias comes from the weave itself, not from elastic fibers, and the fabric recovers after stretching. |
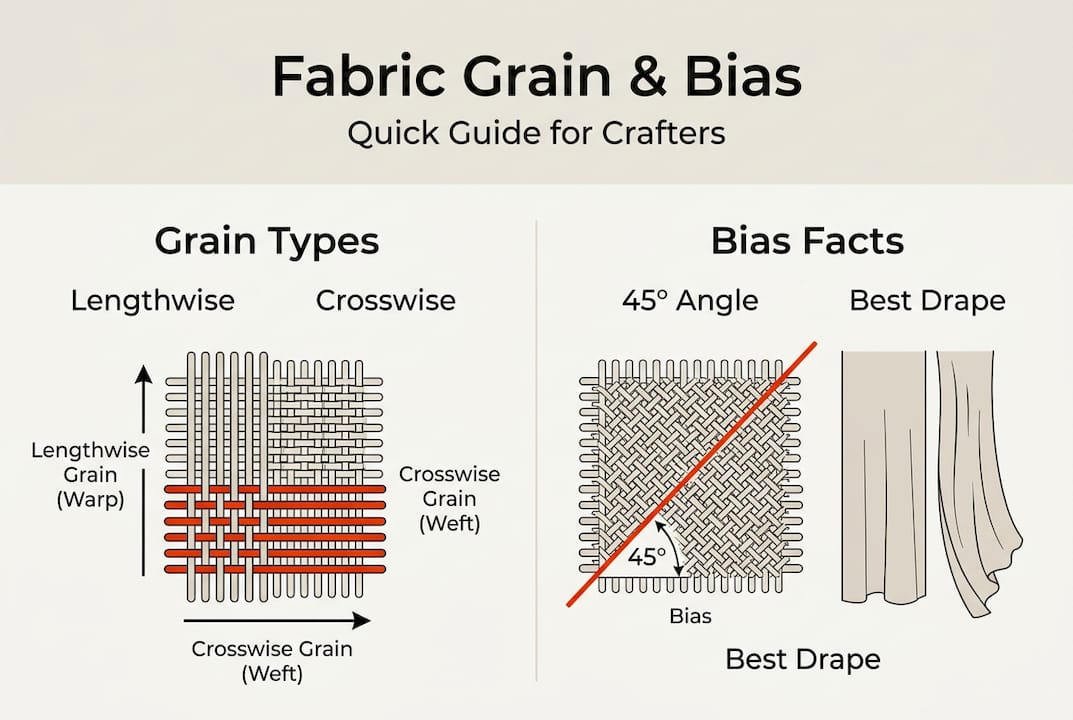
Every woven fabric has three grain directions that determine how it behaves. The lengthwise grain, called the warp, runs parallel to the selvage and has minimal stretch because these threads bear tension during weaving. The crosswise grain, or weft, runs perpendicular to the selvage and offers slightly more give. Then there’s bias, which runs diagonally across both.
Most crafters know bias is diagonal, but bias in fabric refers to the diagonal direction at a 45-degree angle to warp and weft, providing maximum stretch. This precise angle matters enormously. Cut at 30 degrees or 60 degrees and you get some stretch, but not the fluid, body-conforming drape that true bias delivers. The magic happens because at 45 degrees, you’re pulling equally against both warp and weft threads, allowing them to shift and realign without breaking.
You can identify true bias through two simple tests. First, fold your fabric so the selvage aligns with the crosswise cut edge. The resulting fold line is true bias. Second, pull the fabric in different diagonal directions. True bias stretches the most, feeling elastic and responsive. Anything less than maximum stretch means you’re off angle.
Understanding fabric grain role helps you predict how each direction behaves:
| Grain Direction | Stretch Level | Best Uses |
|---|---|---|
| Lengthwise (warp) | Minimal | Structural elements, waistbands, stable seams |
| Crosswise (weft) | Slight | Garment width, moderate shaping |
| True bias (45°) | Maximum | Curves, drape, binding, body-conforming designs |
| Near bias (off angle) | Unpredictable | Avoid for precision projects |
The difference between these grain directions becomes obvious when you handle fabric. Pull lengthwise and it barely budges. Pull crosswise and you feel slight give. Pull on true bias and the fabric transforms, becoming fluid and stretchy. This transformation happens because the weave structure allows threads to shift position rather than stretch themselves.
Working on the bias fundamentally changes how fabric interacts with the body. Bias-cut garments have improved drape and flexibility, ideal for dresses and curves like bias tape. The fabric flows over contours instead of fighting them, creating that elegant, vintage Hollywood look you see in 1930s evening gowns.
This drape quality makes bias essential for specific sewing applications. Bias tape wraps smoothly around curved edges like necklines and armholes without puckering. Cowl necklines cascade gracefully when cut on bias. Slip dresses skim the body with minimal seaming. Even practical items like piping and binding work better on bias because the fabric bends without resistance.
The stretch you get from bias is unique in the fabric world. Bias offers stretch without elastane, perfect for body-conforming projects but requires precision. Unlike knit fabrics or materials with elastic fibers, bias stretch comes from the weave structure itself. Threads slide past each other rather than elongating, which means the fabric recovers its shape after stretching. This recovery property makes bias-cut garments maintain their silhouette over time.
Pro Tip: Test your fabric’s bias recovery by stretching a small diagonal section for 10 seconds, then releasing. Good quality fabric for bias work snaps back to its original shape within 2-3 seconds. Slow recovery means the finished garment will stretch out and lose shape with wear.
Bias cutting reduces stiffness in ways that improve comfort. A straight grain collar might stand away from the neck, but a bias-cut collar molds to the curve. Straight grain binding around a circular tablecloth fights the edge, creating ripples. Bias binding follows the curve naturally. This conforming quality explains why lingerie, dancewear, and athletic wear often incorporate bias cuts even when using stretch fabrics, the bias adds another dimension of movement.
The fit benefits extend beyond stretch. Understanding fabric drape guide principles shows how bias interacts with gravity:
These properties make bias ideal for garments that need both structure and fluidity. A bias-cut skirt holds its A-line shape while moving gracefully. A bias neckline binding stays flat without topstitching. A bias-cut sleeve cap eases into the armhole with minimal manipulation.
Fabric selection makes or breaks bias projects. Best fabrics for bias cutting are lightweight, drapey types like cotton lawn, linen, wool challis, and silk; avoid heavy or stretch fabrics. Heavy materials like denim or canvas fight the bias cut, creating bulk and losing the drape advantage. Fabrics with existing stretch, like jersey or spandex blends, become unstable on bias because you’re adding stretch to stretch, making them nearly impossible to control.
Ideal bias fabrics share specific characteristics. They should drape softly when held up, showing fluid folds rather than standing stiff. The weave should be tight enough to prevent excessive fraying but not so dense that it resists the diagonal pull. Natural fibers often perform better than synthetics because they have inherent texture that helps threads grip each other during the shifting that creates bias stretch.
Pro Tip: Before committing to a full project, cut a 12-inch bias square and let it hang overnight. Check for excessive stretching, sagging, or distortion. This test reveals how the fabric will behave in a finished garment and whether it needs stabilizing techniques.
Cutting fabric on bias requires methodical precision. Cutting methodology includes single layer cutting, staystitching, and hanging garments for 24 hours before hemming. Here’s the reliable process:
Following these fabric cutting tips prevents the most common bias disasters. Single layer cutting eliminates the shifting that happens when fabric layers slide against each other. Immediate staystitching locks the bias edge before gravity and handling stretch it out of shape. Never cut bias pieces on a folded edge, the fold itself distorts the grain and creates an inaccurate angle.
| Fabric Type | Bias Suitability | Reason |
|---|---|---|
| Cotton lawn | Excellent | Lightweight, stable weave, beautiful drape |
| Silk charmeuse | Excellent | Ultimate drape, luxurious hand, controlled stretch |
| Linen | Very good | Natural texture, good recovery, wrinkle adds character |
| Wool challis | Very good | Soft drape, warm hand, excellent for garments |
| Rayon | Good | Drapes well but can be slippery to handle |
| Denim | Poor | Too heavy, fights bias stretch |
| Jersey knit | Poor | Already stretchy, becomes unstable on bias |
| Brocade | Poor | Stiff weave prevents bias benefits |
After cutting, handle pieces minimally. Bias fabric stretches from its own weight, so leaving cut pieces lying flat prevents distortion. When you must move them, support the entire piece rather than lifting by one edge. These fashion fabric cutting guide techniques apply doubly to bias work because the fabric is inherently less stable.
Common cutting pitfalls include rushing the marking process, cutting multiple layers simultaneously, and skipping the staystitching step. Each of these mistakes compounds, turning a potentially beautiful bias project into a stretched, distorted mess. Take your time with preparation and you’ll spend less time fighting the fabric during construction.
Even experienced sewers encounter specific challenges when working on bias. Off-bias cutting causes pulling and twisting; prints are hard to match on bias; gravity helps drape but requires pre-wear hanging. The difference between 45-degree true bias and 40-degree near bias might seem trivial, but it creates garments that pull diagonally, twist at seams, and never hang quite right.
Print matching on bias presents unique problems. Stripes, plaids, and geometric patterns that align perfectly on straight grain become complex puzzles on bias. The diagonal cut means pattern elements meet at unexpected angles. Some prints simply don’t work on bias, you’ll spend hours trying to match elements that can’t align due to the angle. Solid colors, small random prints, and directional prints that don’t require matching work best for bias projects.
Fabric tension during sewing requires constant attention. Your machine’s feed dogs want to pull fabric through at an even rate, but bias fabric stretches as it moves. This creates rippling, puckering, and wavy seams. The solution involves reducing presser foot pressure, using a walking foot, and supporting the fabric’s weight so it doesn’t pull itself through the machine. Never let bias fabric hang off your sewing table, the weight creates stretch that shows up as distortion in finished seams.
Pro Tip: Sew bias seams with the stretchier edge on top. This allows the feed dogs to ease the bottom layer while the presser foot controls the top, creating seams that lie flat without puckers. Test on scraps to find the right tension and pressure settings for your specific fabric.
Gravity’s role in bias garments is both blessing and curse. The beautiful drape happens because fabric relaxes and stretches slightly under its own weight, conforming to the body. However, this same quality means bias garments continue stretching for 24 to 48 hours after construction. Hemming immediately results in uneven hemlines as different areas stretch different amounts. The solution is hanging finished garments on a hanger for at least 24 hours, allowing gravity to do its work before you mark and sew the final hem.
Testing fabric behavior before cutting saves enormous frustration. Cut a 6-inch bias strip and pull it gently. Does it recover quickly or stay stretched? Drape it over your hand. Does it flow softly or hang stiff? Manipulate it as you would during sewing. Does it fray excessively or hold together? These simple tests reveal whether your chosen fabric will cooperate with bias techniques or fight you at every step.
Understanding fabric quality guide principles helps you predict bias behavior:
“Working on the bias is like dancing with fabric. You lead, but you have to follow the fabric’s natural movement. Fight it and you both fall down. Work with it and you create something beautiful.” – Anonymous master tailor
Common mistakes extend beyond cutting and include improper pressing, inadequate stabilizing, and ignoring the fabric’s feedback. Pressing bias seams requires a light touch and vertical motion, sliding the iron stretches bias fabric permanently. Skipping interfacing or stabilizing tape on bias necklines and waistbands leads to stretched out, saggy openings. When fabric starts rippling or pulling during construction, stop and reassess rather than forcing it through the machine.
The learning curve for bias work is real, but each project teaches you more about how fabric behaves off grain. Start with small projects like bias tape or simple accessories before tackling a full bias-cut dress. Build your skills progressively and you’ll develop an intuitive feel for managing bias fabric’s unique properties.
Now that you understand how bias transforms fabric behavior, finding the right materials for your projects becomes crucial. Fabric Fabric offers carefully curated selections of lightweight, drapey fabrics that excel in bias applications. Whether you’re creating elegant garments, custom home decor, or professional finishing details, the right fabric makes every technique easier and every result more beautiful.
Explore the backdrop fabrics collection for smooth, flowing materials that showcase bias drape perfectly. These fabrics work beautifully for bias-cut dresses, skirts, and blouses where you want maximum fluidity. The home decor fabric range includes options ideal for bias-cut pillow covers, table linens, and decorative accents that need to conform to curves or drape gracefully.

Every fabric listing includes detailed specifications about weight, drape, and recommended uses, helping you select materials that match your skill level and project requirements. With responsive customer support and quality guarantees, Fabric Fabric makes it easy to source exactly what you need for successful bias projects. Browse the collections today and discover fabrics that bring your creative vision to life.
Bias is any diagonal direction in woven fabric, but true bias specifically means the 45-degree angle between the lengthwise and crosswise grain. This precise angle provides maximum stretch and drape because it allows warp and weft threads to shift equally.
No, lightweight and drapey fabrics like cotton lawn, silk, linen, and wool challis work best for bias cutting. Heavy fabrics like denim or pre-stretched materials like jersey become difficult to control and lose the benefits that make bias cutting worthwhile.
Bias fabric stretches under its own weight due to gravity, which is normal and creates the desired drape. Hang your garment for 24 hours before hemming to allow this stretching to stabilize, preventing uneven hemlines and distorted shapes in the finished piece.
Staystitch all bias edges immediately after cutting, sewing within the seam allowance about 1/8 inch from the raw edge. This stitching line stabilizes the bias and prevents both fraying and stretching during construction.
Yes, quality bias tape must be cut on true bias to wrap smoothly around curves without puckering. Straight grain tape lacks the flexibility needed for curved edges and creates visible ripples and distortion when you try to ease it around corners or circles.