

 US Dollar
7 Must-Know Fabric Cutting Tips for Perfect Results
Posted by BLG on 2025 Dec 5th
Posted by BLG on 2025 Dec 5th

Over 60 percent of American crafters say that choosing the right cutting tools is the biggest factor in project success. Whether you are making a quilt or sewing clothes, the quality of your tools and techniques will affect every cut and seam. This guide breaks down the essentials that help American creators achieve smooth cuts, accurate measurements, and professional results on every fabric project.
| Important Insight | Explanation |
|---|---|
| 1. Use Quality Cutting Tools | Invest in high-quality cutting tools like rotary cutters to ensure clean, precise fabric cuts for successful projects. |
| 2. Always Pre-Wash and Iron Fabrics | Prepare your fabrics by washing and ironing to prevent shrinkage and ensure better cutting accuracy. |
| 3. Keep Blades Sharp | Regularly replace and maintain cutting blades to achieve professional-quality, smooth cuts without tearing fabric. |
| 4. Measure Accurately Before Cutting | Always measure and mark precisely to avoid costly mistakes and wasting materials on misaligned cuts. |
| 5. Properly Position Fabrics While Cutting | Secure your fabric with weights and use a flat, spacious surface to prevent shifting during cutting, enhancing alignment and accuracy. |
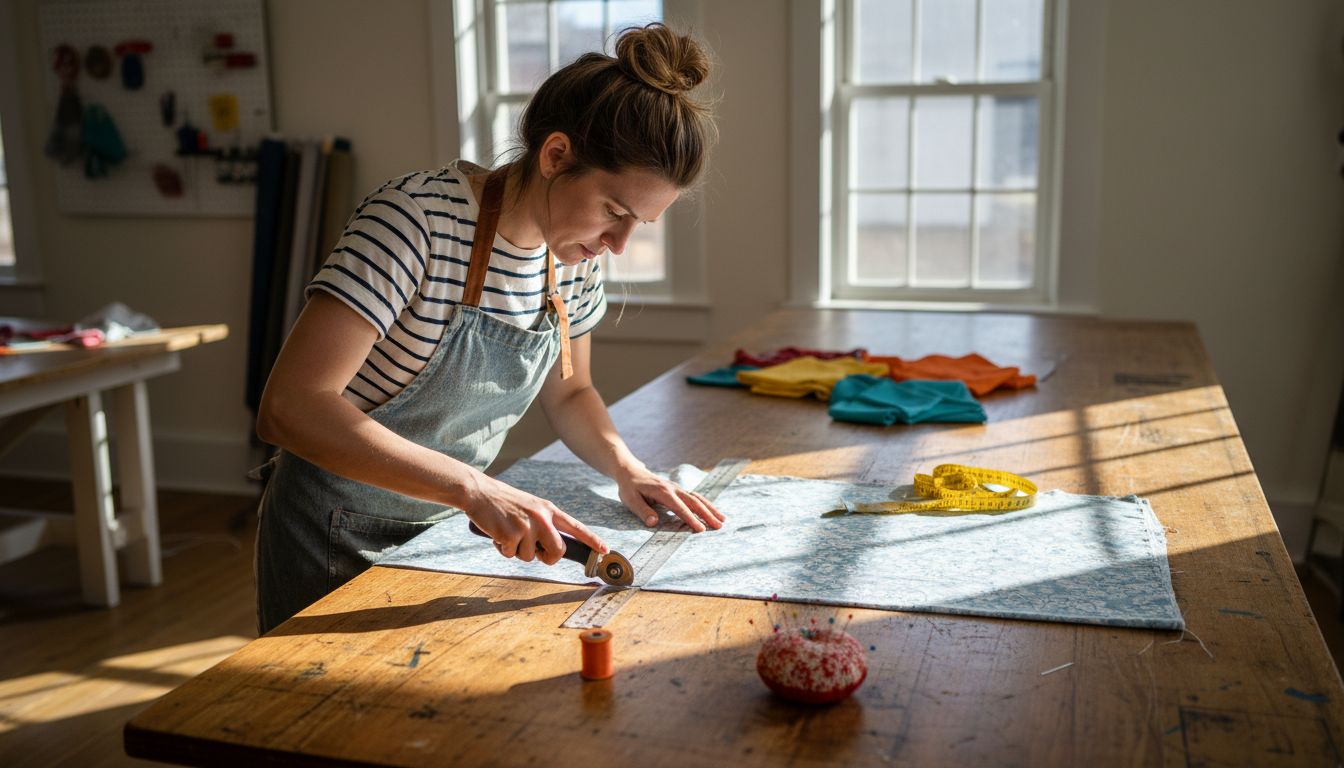
Cutting fabric accurately is the foundation of any successful sewing or crafting project. The right cutting tools can make the difference between professional results and a frustrating experience.
When selecting fabric cutting tools, rotary cutters stand out as a game changing option. These specialized tools offer precision and efficiency that traditional scissors simply cannot match. Rotary cutters are particularly powerful for quilters and sewists working with multiple fabric layers, allowing clean cuts across different textures and thicknesses.
Key Considerations for Cutting Tools:
Pro sewists recommend having multiple cutting tools in your arsenal. A sharp rotary cutter with replaceable blades works best for straight lines and geometric shapes, while precision scissors remain essential for intricate curves and detailed trimming.
When purchasing your cutting tools, invest in quality. Dull or low grade tools will fray fabric edges, create uneven cuts, and potentially ruin expensive materials. Regularly replacing blades and maintaining your tools ensures clean, professional results every time.
Skipping pre washing and ironing might seem like a time saver, but it can lead to disastrous results in your sewing projects. Preparing your fabric properly is a critical step that prevents unexpected shrinkage, distortion, and uneven cutting.
Fabric care basics reveal that different textiles respond uniquely to washing and heat. Natural fibers like cotton and linen are notorious for significant shrinkage, while synthetic materials might require specialized handling.
Pre Washing Steps:
Ironing Techniques:
Professional sewists understand that proper fabric preparation is not just a suggestion its a fundamental technique that separates amateur projects from professional quality work. Taking an extra 30 minutes to pre wash and iron can save hours of potential frustration and ensure your final product looks polished and precise.
Sharp cutting tools are the secret weapon of professional sewists and crafters. Dull blades can transform a promising project into a frustrating mess of frayed edges and uneven lines.
Rotary cutters are particularly sensitive to blade quality, with their performance dramatically impacted by blade sharpness. A worn blade will tear fabric fibers instead of cleanly slicing through them, creating ragged edges that compromise your entire project.
Blade Maintenance Essentials:
Alternative Cutting Options:
For specialized fabric edges, pinking shears offer a unique solution. Their zigzag blade design helps minimize fabric fraying by creating a strategically textured cut that reduces unraveling along the fabric edge.
Professional sewists recommend keeping multiple cutting tools sharp and ready. A high quality fabric scissors set alongside a well maintained rotary cutter ensures you are prepared for any cutting challenge. Remember that investing in blade maintenance is far less expensive than replacing ruined fabric or struggling through poorly executed projects.
Accurate fabric measurement is the foundation of any successful sewing project. One misaligned mark can transform a potential masterpiece into a frustrating error that wastes both time and expensive materials.
Fabric yardage requires precise measurement techniques that go beyond simple ruler markings. Professional sewists understand that accurate marking involves understanding fabric grain, stretch, and potential distortion.
Essential Marking Tools:
Measurement Best Practices:
Professional sewists recommend creating a dedicated measuring station with good lighting and a large flat surface. Taking an extra few minutes to measure carefully can save hours of potential rework and prevent costly mistakes in your sewing projects.
Fabric shifting during cutting can transform a promising project into a frustrating mess of uneven edges and misaligned patterns. Proper positioning is the secret weapon of professional sewists who understand that preparation prevents poor performance.
Fabric structure plays a critical role in how materials behave during cutting. Different textiles require unique stabilization strategies to maintain grain alignment and prevent unwanted stretching or distortion.
Positioning Tools and Techniques:
Strategic Fabric Stabilization Methods:
Professional crafters recommend creating a dedicated cutting zone with ample space and the right tools. Taking time to secure your fabric properly will dramatically improve the accuracy and quality of your final project.
Cutting fabric is an art that requires precision, technique, and the right tools. Different projects demand different cutting approaches whether you are creating straight line patterns or intricate curved designs.
Rotary cutters offer exceptional versatility for fabric cutting, with various blade sizes that accommodate both linear and rounded cutting techniques. Understanding how to manipulate your cutting tools can transform your sewing and crafting results.
Straight Cutting Techniques:
Curved Cutting Strategies:
Mastering both straight and curved cutting methods requires practice and patience. Professional sewists recommend starting with simple patterns and gradually increasing complexity as your skills improve. Remember that smooth controlled movements always produce better results than rushed imprecise cuts.
Cutting tools are an investment in your craft, and proper maintenance ensures they remain sharp, accurate, and safe for years of use. Neglecting your tools can lead to poor cutting performance and potential safety risks.
Rotary cutters require specific care to maintain their precision and effectiveness. Professional crafters understand that tool maintenance is just as important as the cutting technique itself.
Safe Storage Practices:
Tool Maintenance Essentials:
Investing a few minutes in tool maintenance can save you money and frustration in the long run. Professional sewists recommend creating a dedicated tool care station with cleaning supplies, replacement blades, and protective storage solutions. Your cutting tools are the gateway to precise and beautiful crafting projects.
Below is a comprehensive table summarizing the essential tips and strategies for fabric cutting tools and techniques as discussed throughout the article.
| Aspect | Details | Key Considerations |
|---|---|---|
| Cutting Tools | Rotary cutters offer precision and efficiency. Blades range from 28mm to 60mm. Ergonomic handles reduce hand strain. | Choose the right blade size for your project. Match blades with fabric weight and texture. |
| Fabric Preparation | Pre-washing and ironing prevent shrinkage and distortion. Use correct washing and ironing settings. | Separate colors; avoid fabric softeners. Iron on fabric’s wrong side for delicates. |
| Blade Maintenance | Replace blades every 10-15 projects. Stored properly, sharp tools prevent fraying. | Clean after use to remove debris. Use protective cases for storage. |
| Measurement & Marking | Accurate marks prevent errors. Chalk and water-soluble pens offer versatility. | Measure twice, mark on fabric’s wrong side, use weights to keep it flat. |
| Fabric Positioning | Use fabric weights and non-slip mats to stabilize fabric. | Prevent stretching; align grain correctly. Use smooth weights. |
| Cutting Techniques | Straight and curved cuts require different approaches. Rotary cutters and scissors are key. | Practice consistency in cuts. Use smaller blades for curves. |
| Tool Storage | Proper maintenance ensures safety and effectiveness. Store in dedicated cases. | Close blade guards when not in use, keep away from moisture. |
Struggling with uneven cuts and fabric fraying despite following all the expert tips can be exhausting. This article highlights essential challenges such as using the right cutting tools, maintaining blade sharpness, and securing fabrics properly. To master these techniques, you need not only skill but also access to premium fabrics and reliable tools designed for precision. Whether you are cutting delicate satin or layered quilting fabrics understanding fabric handling and tool care is key for professional results.

Discover a curated selection of high-quality textiles like lace, velvet, and seersucker at Fabric-Fabric.com that perfectly complement your newfound cutting skills. Benefit from clear fabric descriptions and usage tips that ensure you choose the ideal material for your project. Act now to shop fabrics designed for craft, apparel, and home decor use and enjoy perks like seasonal discounts and free shipping. Take the next step toward flawless cuts and perfect projects by exploring our online fabric collection today. Enhance your crafting journey with quality starting at your fingertips.
Using a rotary cutter is often the best choice for fabric cutting, as it offers precision and efficiency that scissors lack. Choose a blade size between 28mm to 60mm based on your project complexity for optimal results.
Always pre-wash and iron your fabric before cutting to prevent shrinkage and distortion. This simple step can save you hours of frustration and ensures your fabric is flat and ready for accurate cutting.
Regularly replace your rotary cutter blades every 10 to 15 projects or sooner if you notice reduced performance. Keeping blades sharp will create cleaner, smoother cuts and minimize frayed edges in your fabric.
Use fabric chalk or water-soluble marking pens to make your cutting lines. Always measure twice and mark on the wrong side of the fabric to preserve its appearance and accuracy during the cutting process.
Securing your fabric with weights along the edges and pattern lines will help prevent shifting. Aim to use multiple small weights rather than a few large ones to maintain fabric alignment and prevent distortion during cutting.
For straight cuts, use a long metal ruler as a guide and maintain consistent pressure with your rotary cutter. For curves, consider smaller cutter blades and make incremental movements for greater control and accuracy.