

 Canadian Dollars
How to Measure for Fabric Yardage: Step-by-Step Guide
Posted by BLG on 2025 Dec 17th
Posted by BLG on 2025 Dec 17th


Over 60 percent of American crafters admit they have miscalculated fabric for at least one project. Measuring fabric may sound straightforward, but each step shapes the accuracy of your final results. Whether you are quilting or sewing clothes, the right technique saves money and reduces frustration. This guide shows you simple ways to gather your tools and calculate the correct yardage so you never waste fabric again.
| Key Point | Explanation |
|---|---|
| 1. Prepare Before Measuring Fabric | Gather project details, tools, and create a plan to avoid waste and mistakes. |
| 2. Accurately Measure Dimensions | Measure project areas and fabric types carefully to ensure correct yardage. |
| 3. Calculate Yardage Precisely | Use the standard formula and include seam allowances or pattern matching factors. |
| 4. Account for Patterns and Shrinkage | Consider pattern direction and wash fabric to anticipate shrinkage before buying. |
| 5. Verify Measurements Thoroughly | Double-check all calculations and layout to catch errors and ensure proper fit. |
Before diving into fabric measurement, you need a strategic plan. Careful preparation prevents wasted time and materials. Understanding the shape of your project and fabric width is crucial to ensure precise measurements.
Start by sketching your project on graph paper or taking detailed notes about your specific requirements. Identify the exact dimensions you need and consider factors like pattern repeat, fabric direction, and potential shrinkage. Collect essential measuring tools like a fabric measuring tape, straight edge ruler, chalk markers, and sharp scissors. For more complex projects like quilting or garment construction, you might also want pattern drafting tools or a cutting mat.
Decide whether you need to account for seam allowances or pattern matching. Different fabric types require different measurement approaches. Lightweight cotton will behave differently than thick upholstery material, so understanding your specific textile is key.
Pro Tip: Create a small project worksheet that lists your exact measurements, fabric type, and required tools. This simple step can save you significant time and prevent costly measuring mistakes.
Now that you have gathered your project details, it is time to precisely determine the specific dimensions and fabric type you will need. Standard fabric widths can significantly impact your yardage requirements, with different widths serving different project purposes.
Measure the exact dimensions of your project area or pattern piece. Consider the width of your chosen fabric carefully. For instance, a 45-inch wide fabric works perfectly for shirts and dresses, while a 54-inch wide fabric is ideal for upholstery and heavier garment construction. Pay attention to pattern repeats, which can affect how much fabric you ultimately need. Some intricate designs require extra fabric to match patterns seamlessly.

Understand how fabric weight and stretch will influence your measurements. Lightweight cotton will drape differently than a thick wool, and stretch fabrics require different calculation methods compared to woven materials. Sketch out your project dimensions on graph paper, marking the exact fabric width and pattern placement to help visualize your final yardage needs.
Pro Tip: Always add an extra 10-15% to your fabric measurements to account for potential mistakes, pattern matching, or unexpected design adjustments.
Here is a quick reference comparing common fabric types and their impact on measuring and yardage calculations:
| Fabric Type | Typical Use | Measurement Consideration | Shrinkage Risk |
|---|---|---|---|
| Lightweight Cotton | Shirts, dresses, quilts | Easy to measure, drapes easily | Higher, prewash needed |
| Upholstery Fabric | Sofas, chairs, drapery | Bulkier, may need extra for seams | Low to moderate |
| Wool | Coats, winter garments | Needs allowance for bulk/stretch | Moderate, test first |
| Stretch Knit | T-shirts, activewear | Requires negative ease calculation | Varies, check type |
Calculating fabric yardage requires precision and strategic planning. Understanding the specific formula for calculating yardage will help you purchase the right amount of fabric for your project without waste or shortfall.
Start by measuring the length and width of each pattern piece carefully. Account for seam allowances and hemming requirements that might increase your total fabric needs. The standard calculation method involves multiplying the number of pattern pieces by their individual lengths and dividing by 36 to convert inches to yards. For complex projects with multiple pieces or pattern matching, consider adding an extra buffer of fabric to accommodate potential adjustments.
Pay close attention to fabric width when calculating yardage. Narrower fabrics will require more length to accommodate the same number of pattern pieces compared to wider fabrics. If your pattern pieces are large or you need to match intricate designs, you might need to purchase more fabric than the basic calculation suggests.
Pro Tip: Always round up your fabric yardage to the nearest quarter or half yard to ensure you have sufficient material for your entire project.
Successfully calculating fabric yardage requires considering more than just basic measurements. Understanding how pattern direction and potential shrinkage impact your fabric requirements is critical for achieving professional results.
When working with patterned fabrics, carefully examine the print direction and repeat. Directional prints demand extra attention to ensure images align correctly in your final project. Some patterns might require you to cut pieces in specific orientations, which can significantly increase your fabric needs. As a general guideline, add approximately 0.5 yards of fabric for complex pattern matching and consider an additional 10% buffer for potential shrinkage or unexpected adjustments.
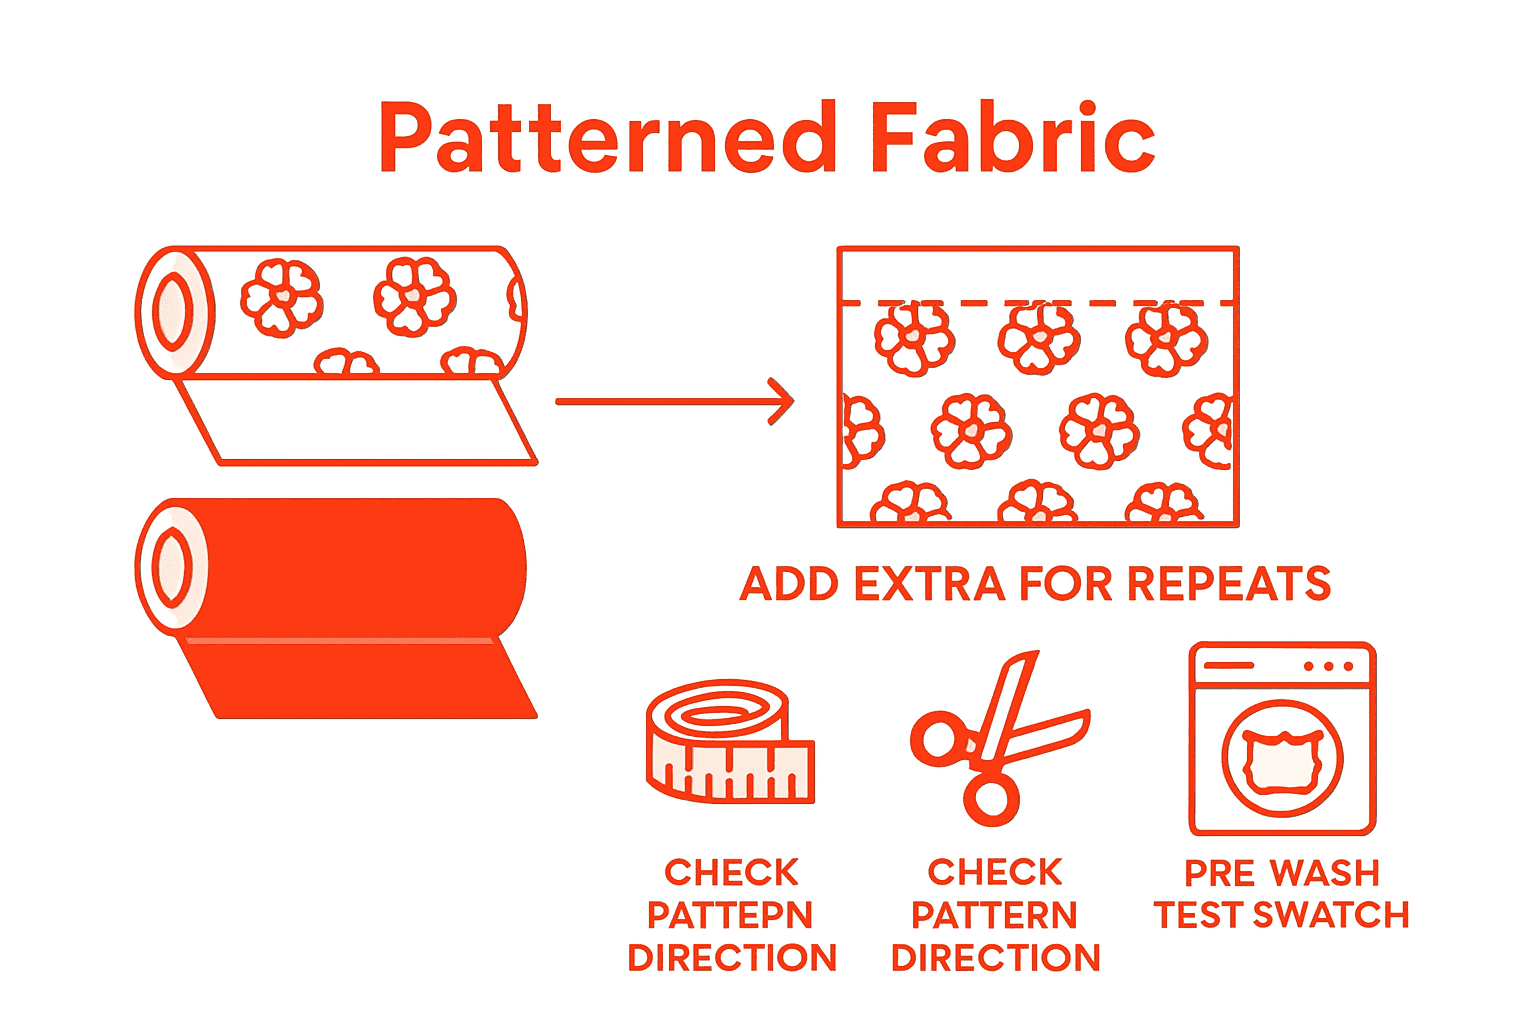
Pre-washing your fabric becomes crucial in this stage. Different fabric types shrink at varying rates, so conducting a preliminary wash can help you anticipate and compensate for potential size changes. Lightweight cottons might shrink more dramatically than synthetic blends, so always factor in this potential variation when calculating your total yardage requirements.
Pro Tip: Create a small test swatch and wash it exactly as you plan to treat the final project to get an accurate measurement of potential fabric shrinkage.
Before finalizing your fabric purchase, take a moment to meticulously review all your measurements and calculations. Experts recommend sketching your project on graph paper to create a precise plan, which can help you catch potential measurement errors before buying fabric.
Double-check every dimension of your pattern pieces, ensuring you have accounted for seam allowances, pattern matching, and potential shrinkage. Lay out your sketched pattern pieces on the graph paper to confirm they fit within your calculated yardage. Compare your measurements against the actual fabric width you plan to purchase, as this can significantly impact your total fabric requirements. Look for any potential overlaps or inefficient cutting layouts that might waste fabric.
Review your calculations with a fresh perspective. If possible, ask another person to look over your measurements and verify your math. Sometimes a second set of eyes can catch subtle errors or suggest more efficient cutting strategies that you might have overlooked. Consider creating a small mock-up or muslin prototype to test your measurements and confirm the fit before investing in your final fabric.
Pro Tip: Take a photo of your measurement sketches and calculations to keep a digital backup and reference for future projects.
This table summarizes key steps and checkpoints for accurate fabric measurement:
| Step | Essential Action | Common Oversight |
|---|---|---|
| Initial Planning | Sketch and note requirements | Ignoring fabric grain/direction |
| Measuring and Calculating | Include seam/pattern allowances | Forgetting fabric width impact |
| Adjust for Pattern/Shrinkage | Prewash, add pattern buffer | Overlooking print orientation |
| Final Verification | Recheck math, review layout | Missing seam or shrinkage needs |
Measuring fabric yardage accurately can be challenging with so many factors like fabric width, pattern matching, and shrinkage to consider. If you want to avoid costly mistakes and wasted material, take advantage of our extensive fabric selection tailored for apparel, upholstery, quilting, and crafts. Whether you need lightweight cotton or heavy upholstery fabric, we offer detailed descriptions to help you pick the right textile for your exact project needs.

Start shopping now at Fabric-Fabric and benefit from an easy-to-use site designed for crafters and professionals alike. Explore our diverse collections and find the ideal fabric with confidence by carefully reviewing yardage and fabric type. Don’t wait to bring your project vision to life with quality materials and expert support just a click away. Visit https://fabric-fabric.com to get started and make every yard count.
Begin by gathering your project details and tools. Sketch your project on graph paper, taking note of required dimensions and any specific fabric considerations.
The width of your fabric can impact how much yardage you need. For example, a 45-inch wide fabric may suit shirts, while a 54-inch fabric works better for upholstery; ensure you consider these variances.
Calculate the required yardage by measuring each pattern piece’s length and width, including seam allowances. Multiply the total length by the number of pieces and then convert to yards, rounding up to the nearest quarter yard.
To account for shrinkage, pre-wash your fabric before finalizing measurements. Adding an additional 10% to your total yardage can help compensate for any unexpected shrinkage during washing.
Review all your measurements and calculations carefully before purchasing. Use your sketched project layout to confirm that all pattern pieces fit within your calculated yardage and involve a second person to check for errors.
When using patterned fabric, check the print direction and repeat closely. Add approximately half a yard when calculating yardage for complex patterns to ensure accurate alignment.