

 US Dollar
How to Plan Fabric Inventory for Optimal Efficiency
Posted by BLG on 2026 Feb 21st
Posted by BLG on 2026 Feb 21st


Sorting through fabric piles only to find unused or duplicate materials is a common headache for many North American designers. With market shifts impacting both cotton availability and costs, every yard of stock becomes more valuable to your bottom line. Smart inventory management gives you a clear view of what you have and what you need, helping you avoid waste and sharp surprises when raw material prices change.
| Key Point | Explanation |
|---|---|
| 1. Conduct a Physical Inventory | Physically count all fabric on hand to create an accurate baseline for ordering and managing stock. |
| 2. Analyze Usage Patterns | Review sales data to identify best-selling fabrics and slow movers, informing future inventory decisions. |
| 3. Organize Fabric Storage | Create a systematic storage system categorized by type and usage to enhance efficiency and reduce waste. |
| 4. Set Reorder Points | Calculate reorder levels for each fabric based on usage and lead time to avoid stockouts. |
| 5. Regularly Verify Inventory | Schedule frequent inventory checks to ensure data accuracy and make informed purchasing decisions. |
You can’t plan inventory effectively without knowing what you actually have on hand and how quickly you’re using it. This first step gives you the foundation for all future decisions about ordering, storage, and waste reduction.
Start by conducting a physical inventory count of every fabric you have in stock. Walk through your workspace and note the quantity, type, color, and weight of each material. This sounds tedious, but it takes most small designers just a few hours, and you’ll have clear data instead of guesses.
As you count, document the information in a spreadsheet or simple database. Include columns for fabric name, yardage on hand, purchase date, and price per yard. You’ll use this baseline repeatedly over the coming months.
Next, analyze your usage patterns over the last 3 to 6 months. Pull receipts, project notes, or production records to identify which fabrics you actually use and which ones sit dormant. Look for patterns:
Recent market trends show that cotton production volumes have fluctuated significantly due to weather and input costs, which affects the availability and pricing of raw materials. Tracking your own usage helps you adapt when supply becomes tighter or pricing shifts unexpectedly.
Compare your usage data against your inventory. If you have 50 yards of a fabric but only use 2 yards per month, that’s a slow mover. If you use 15 yards monthly but only have 8 yards left, that’s a fast mover you should reorder soon.
Don’t skip the dead stock. Identify any fabrics that haven’t moved in 6 months or longer. These are candidates for marking down, bundling into clearance packages, or donating.
When calculating what you’ve spent on inventory, consider using fabric cost estimation methods to understand your total investment and which items are consuming the most capital.
Your current inventory count and usage trends form the complete picture of your fabric business—without this data, all other planning decisions are guesses.
Pro tip: Set a recurring calendar reminder to track usage weekly instead of waiting 6 months. Spend 5 minutes Friday afternoon noting what you sold or used that week; you’ll spot trends much faster and catch slow inventory before it becomes deadstock.
Here’s how different inventory issues can impact your fabric business:
| Inventory Issue | Business Impact | Typical Solution |
|---|---|---|
| Overstocking | Ties up cash, increases storage costs | Reduce future purchase quantities |
| Stockouts | Lost sales, delays for customers | Set accurate reorder points |
| Deadstock | Wasted space and capital | Mark down or donate unsold fabrics |
| Inaccurate Records | Poor planning, missed orders | Conduct regular physical counts |
Demand forecasting transforms guesswork into strategy. By predicting what your customers will actually need, you can order fabric strategically and avoid tying up capital in materials that won’t sell.
Start by reviewing your sales history from the past 12 months. Look at which projects gained traction, which designs customers requested repeatedly, and which seasonal patterns emerged. Did summer bring more lightweight cotton orders? Did fall see an uptick in heavier wool and flannel requests?
Break down your data by product category, customer type, and time period. If you sell both apparel fabrics and home decor fabrics, track them separately. Your demand patterns likely differ significantly between these markets.
Next, talk directly with your customers about their plans. Send a quick survey or email to your regular clients asking what they’re planning to create in the coming months. Small business owners and independent designers often know their upcoming projects weeks or months in advance.
You can also reach out to collaborators or retailers who stock your designs. Ask them what they anticipate selling and what feedback they’re hearing from their customers. These conversations reveal demand signals you won’t find in your own sales data.
Understanding demand forecasting methods helps you combine customer feedback with historical sales data to make informed predictions. The more data points you gather, the clearer your forecast becomes.
Create a simple forecast spreadsheet listing your top 10 to 15 fabrics. For each one, estimate monthly demand for the next 3 to 6 months based on historical patterns, customer feedback, and seasonal trends. Don’t aim for perfect accuracy—just reasonable estimates.
Consider external factors too. Are there industry trends, fashion shifts, or economic changes affecting demand? A recession might shift customers toward durable basics. A viral design trend could spike demand unexpectedly.
Build in a confidence level for each forecast. High confidence forecasts are based on steady historical demand. Low confidence forecasts are new products or uncertain markets where you’re testing demand.
Your demand forecast is your roadmap for purchasing decisions—it prevents overstock of slow movers and stockouts of popular items.
Pro tip: Update your demand forecast monthly as new sales data comes in, but don’t obsess over short-term fluctuations. Look for patterns over 3-month rolling windows to smooth out temporary spikes and avoid overreacting to a single busy week.
A well-organized storage system saves you time every single day. When fabrics are categorized logically and stored accessibly, you spend less time searching and more time creating.
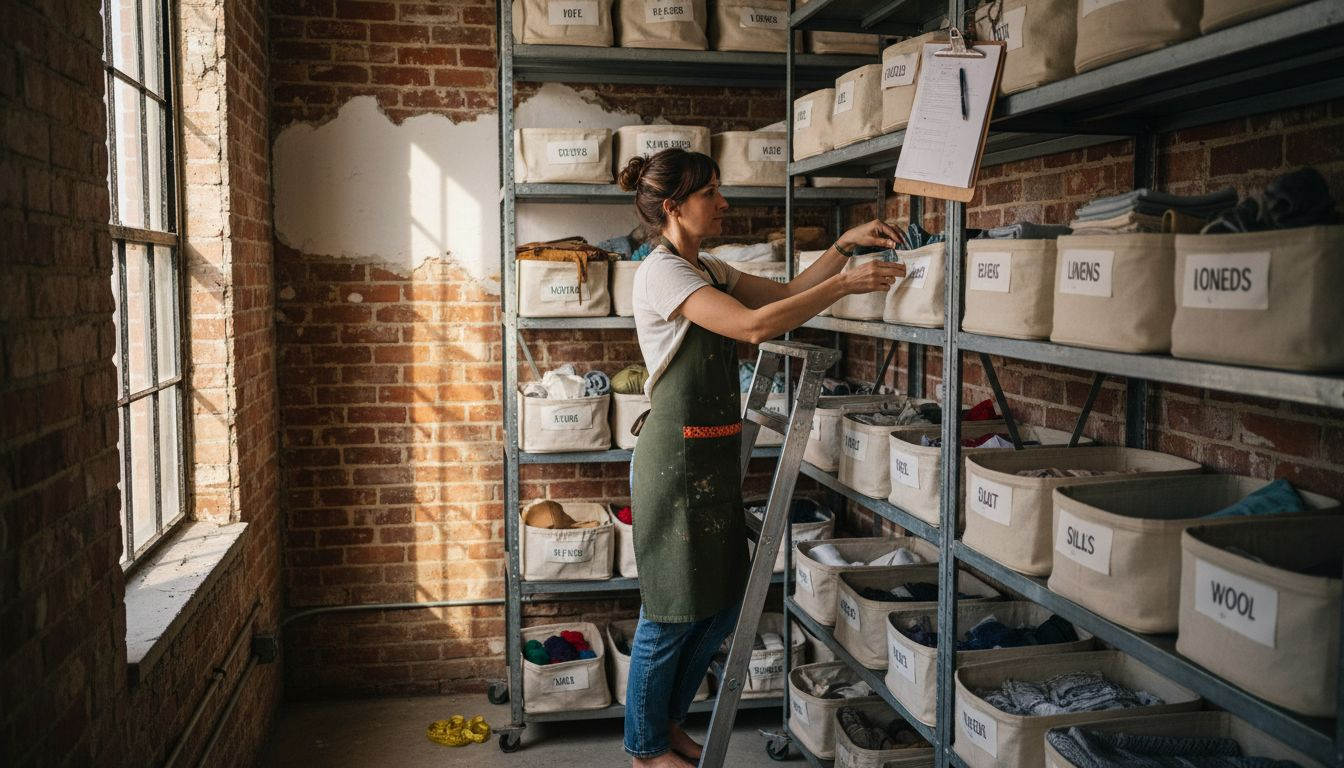
Start by grouping your fabrics into logical categories based on how you actually use them. This might mean organizing by fabric type, weight, color, end use, or a combination. The key is choosing categories that match your workflow.
Here’s a practical approach for most small design businesses:
Applying category management principles to your fabric inventory helps you allocate storage space efficiently and find materials faster. When similar items are grouped together, you also spot duplicates and gaps in your stock more easily.
Label everything clearly. Use a marker or printed labels on shelves, bins, or hanging rods showing the category, fabric type, and weight. Your future self will appreciate this when searching under time pressure.
Next, assess your physical space and storage options. Small designers often work with limited square footage, so choose storage that maximizes vertical space. Wall-mounted shelving, rolling racks, and clear plastic bins let you see contents without unpacking.
Consider how frequently you access each fabric. Your most-used materials should be at eye level and within arm’s reach. Seasonal or specialty fabrics can go higher or deeper into storage. Rarely used deadstock belongs in a separate clearance area where it won’t clutter your main workspace.
Create a simple map or spreadsheet showing where each category lives in your space. This becomes invaluable when you’re rushing to fill an order or grab a specific fabric for a client meeting.
Store folded fabrics with the cut edge facing outward so you can see exactly how much yardage remains. This prevents the frustration of pulling out a bolt only to discover you have just one yard left.
Organized storage reduces waste because you know what you have, avoid duplicate purchases, and use materials efficiently.
Pro tip: Take phone photos of each storage area from above and label them by category in a folder on your phone. When customers ask if you have a particular fabric, you can visually search your phone photos in seconds instead of walking to the back storage room.
Reorder points are your safety net. They tell you exactly when to place a new fabric order so you never run out of stock or overstock shelves with deadweight inventory.
Start by calculating a reorder point for each of your key fabrics. This is the inventory level at which you need to place an order. The formula accounts for two things: how quickly you use the fabric and how long it takes to receive new stock.
Here’s the basic approach:
For example, if you use 10 yards of a cotton print monthly and your supplier needs 14 days to deliver, you’d reorder when inventory drops to approximately 5 to 7 yards (accounting for roughly two weeks of usage plus a small buffer).
Understanding reorder point calculations helps you balance keeping enough stock to fill orders without tying up cash in excess inventory. The math prevents both stockouts and overstock situations.
Now track your fabric movements actively. Every time you pull fabric for a project, log it. Every time you receive new stock, record it. This creates a running tally showing velocity (how fast each item moves).
You don’t need complicated software. A simple spreadsheet works perfectly. Create columns for fabric name, current stock, reorder point, last order date, and movement notes. Update it weekly during your inventory check.
When a fabric hits its reorder point, take action immediately. Don’t wait until it’s gone. Place your order so the new stock arrives before you run out.
Watch for fabrics that consistently miss their reorder point because demand is lower than expected. These are candidates for marking down or discontinuing. Similarly, watch for fabrics that burn through stock faster than your forecast predicted. These are winners worth reordering in larger quantities.
Reorder points transformed into action prevent the two worst inventory disasters: losing sales because you’re out of stock, and wasting cash on fabric that never sells.
Pro tip: Set phone reminders for your top 5 fabrics’ reorder points rather than waiting for a spreadsheet check. When the reminder pops, spend two minutes checking current stock and placing an order if needed—this prevents procrastination and stockouts.
Inaccurate inventory data destroys planning. If your spreadsheet says you have 20 yards of fabric but you actually have 8, your entire reorder strategy falls apart. Regular verification keeps your system honest.
Schedule a physical count at least quarterly, ideally monthly if you’re managing a significant inventory. Set aside a few hours to walk through your storage, count each fabric, and compare the actual quantities to your records.
Here’s what to check during verification:
When you find differences between counted stock and recorded stock, dig into why. Did someone use fabric without logging it? Was there shrinkage or waste during cutting? Did a supplier send less than invoiced? Understanding the source of errors prevents them from repeating.
Accurate inventory data supports adaptive planning that responds to real supply and demand conditions. When your records reflect actual stock, you can make confident purchasing and production decisions.
As you verify, adjust your planning strategies based on what you’ve learned. If a fabric moved 40 percent faster than forecasted, increase your reorder quantity. If another fabric has been sitting untouched for eight months, reduce future orders or discontinue it entirely.
Update your reorder points if lead times have changed with suppliers. Adjust safety stock levels if demand has become more or less predictable. Revise your demand forecast based on recent sales patterns.
Document these adjustments in a planning log so you can track what changed and why. Over time, you’ll build a knowledge base about your inventory patterns that makes planning more accurate and efficient.
Use verification as a teaching moment. If you have team members handling fabric, review accuracy findings with them. Show them how their logging affects the entire system. When everyone understands the importance, accuracy improves naturally.
Inventory verification isn’t busywork—it’s the moment you catch planning errors before they become costly problems.
Pro tip: Conduct spot checks on your top 10 fabrics every two weeks instead of waiting for monthly counts. Spend 10 minutes verifying your highest-velocity items; if those are accurate, your overall system is probably solid, and you catch discrepancies before they compound.
Here’s a summary of how each step in inventory planning strengthens your operations:
| Step | Main Goal | Key Benefit |
|---|---|---|
| Assess Inventory & Usage | Know stock and movement | Basis for all planning |
| Forecast Demand | Predict future orders | Prevents over/under-stocking |
| Organize & Store Efficiently | Optimize workspace access | Saves time, reduces waste |
| Set Reorder Points & Tracking | Time restocks accurately | Ensures timely availability |
| Verify & Adjust Strategies | Keep data accurate and relevant | Supports confident decisions |
Efficient inventory planning is essential to avoid overstocking, reduce deadstock, and maintain steady supplies of your most popular fabrics. If you want to master reorder points, track usage trends, and keep your storage organized keep your fabric inventory balanced with carefully selected materials from our fashion category. Our wide range of quality fabrics offers precisely what you need to support your forecasting and inventory strategies.

Take control today by exploring our curated fabric collections at https://fabric-fabric.com. Whether you are replenishing core stock or experimenting with new styles trust us to deliver efficient sourcing options. Don’t let incorrect planning hold you back visit our site for seamless shopping and smart fabric choices that align with your inventory goals. Check out clearance fabrics in our Scrap Bags section to reduce waste and refresh your stock with budget-friendly options.
Start by conducting a physical inventory count of all fabrics, noting the quantity, type, color, and weight. Document this information in a spreadsheet and analyze your usage patterns over the last 3 to 6 months to identify which fabrics are moving quickly and which are slow movers.
Begin by reviewing your sales history from the past 12 months to identify patterns, then communicate directly with customers to gather insights about their upcoming projects. Create a forecast spreadsheet estimating monthly demand for your top fabrics based on historical usage and customer feedback.
Group your fabrics into logical categories based on how you use them, such as by fabric type, weight, or color. Ensure everything is clearly labeled and assess your physical space to maximize storage efficiency, placing frequently used items at eye level for easy access.
Calculate reorder points by determining your average monthly usage, supplier lead time, and safety stock. Use the formula to find the reorder level where you need to place a new order, helping prevent stockouts and overstock situations.
Regularly verifying your inventory data is crucial to maintain its accuracy and relevance. Schedule physical counts at least quarterly and immediately investigate any discrepancies, ensuring your planning strategies are based on real data and preventing costly errors.
Analyze your patterns to decide whether to mark down or bundle slow-moving and dead stock for clearance or donation. Take immediate action to reduce the amount of unsold fabric on your shelves, enabling you to free up cash and space for more in-demand materials.